Showing posts with label Recipes. Show all posts

Wednesday, October 22, 2014

One of my favorites

Hey all!

Okay, so the topic that we'd talked about blogging on is favorites. One of my favorite things is the fact that Josh loves to grill, cook, and bake! Josh and I both take turns making our meals. I enjoy cooking, but it is also so nice to have a spouse that loves to cook too! 

One of my favorite meals that we have is a bbq'd maple chicken salad. (Josh bbq's the chicken and we eat it with romaine lettuce). 

On Conference Sunday Josh woke me up and let me know that he'd made breakfast. Hash browns and eggs. 


Anyway, that's it for today! 

Sheri 

Friday, October 3, 2014

Recipes

As many of you know, I love to cook as well as I love nutrition. I love learning about it and applying it to my daily life. In one of my nutrition classes this semester, I have to give a 20 minute presentation on something that is nutrition related. I have had the hardest time trying to figure out what in the world to do this presentation on.
I went in and was talking to my friend Matt Schmidt and he gave me the most excellent idea. I know right now in my life I am incredibly busy and I am hardly ever home, but generally when I do go home it is to make me dinner. I know that all of us have crazy busy lives and most everyone is trying to prepare dinner for their families that are both nutritious and delicious.
So I decided that I am going to do my presentation on quick, easy, nutritious meals for a crazy busy person. It will emphasize how people who make homemade meals are healthier than those who eat out everyday and if you just take 30 minutes to prepare them you are making your whole family healthier. This is where you all come in, I love hearing ideas of foods that are super good, and quick to make. Something that isn't the same old hamburger rice or potato bar every night. We all know how to do that. I know that all my sisters enjoy time in the kitchen, so I am asking that you post some of your favorite quick, and easy meals so that I can use them for my presentation. I am thinking I will put them into categories so give me anything and everything you've got.
I know I can of course use pinterest for ideas and things that way but I want to use things that I know will work.
Tell me your input and what you think of this whole presentation idea. Love you all!

Thursday, September 4, 2014

Asian Chicken Recipe

Here is the recipe for the BBQ Asian Chicken I did on Sunday.  Enjoy!

Asian Grilled Chicken

INGREDIENTS:

1/3 cup soy sauce
1/3 cup brown sugar
Juice and zest from one lime (or 2 tablespoons lime juice)
 juice and zest from an orange (or 2 tablespoons orange juice)
1 tablespoon Honey
1 - 1.5 teaspoons Sriracha® 
3 cloves garlic, minced
4 skinless, boneless chicken breasts (trim fat off, smash with mallet/pan, and poke holes with fork)
1 tsp corn starch

DIRECTIONS:

1. Place the soy sauce, brown sugar, lime juice, orange juice, honey, Sriracha, garlic, and corn starch in a large plastic zipper bag. Seal and knead the bag with your fingers to mix all the ingredients and dissolve the sugar. Place the chicken breasts into the marinade, squeeze out the air from the bag, zip the bag closed, and refrigerate for 4 hours or overnight.

2. Preheat an outdoor grill for medium-low heat; lightly oil the grate.

3. Remove the chicken from the bag, pour the excess marinade into a small saucepan, and bring to a full boil for about 1 minute to sterilize the marinade.

4. Grill the chicken breasts until they are no longer pink in the middle and show grill marks, about 25 minutes, basting them generously with the sterilized marinade as they grill. Let rest about 5 minutes before serving.


Printed from Allrecipes.com 8/28/2014


Sunday, June 29, 2014

Caramel Bars


Caramel Bars
Mary Peterson
 
1 cup flour
¼ teaspoon salt
¼ teaspoon baking soda
1 cup brown sugar
¾ cup oats
½ cup softened butter

Use your pastry cutter to combine all the above.  Set aside 1 cup.  Press the rest into an 8 x 8 pan lined with parchment paper.  Bake at 350 for 7 minutes.

On stove, melt together:
1 (11 oz.) package caramel bits
2 tablespoons milk

Once melted, add:
2 tablespoons flour

Pour caramel onto cooked crust.  Sprinkle the reserved 1 cup on top.  Bake at 350 for 10 minutes.

Tuesday, February 25, 2014

Chop Like a Pro!

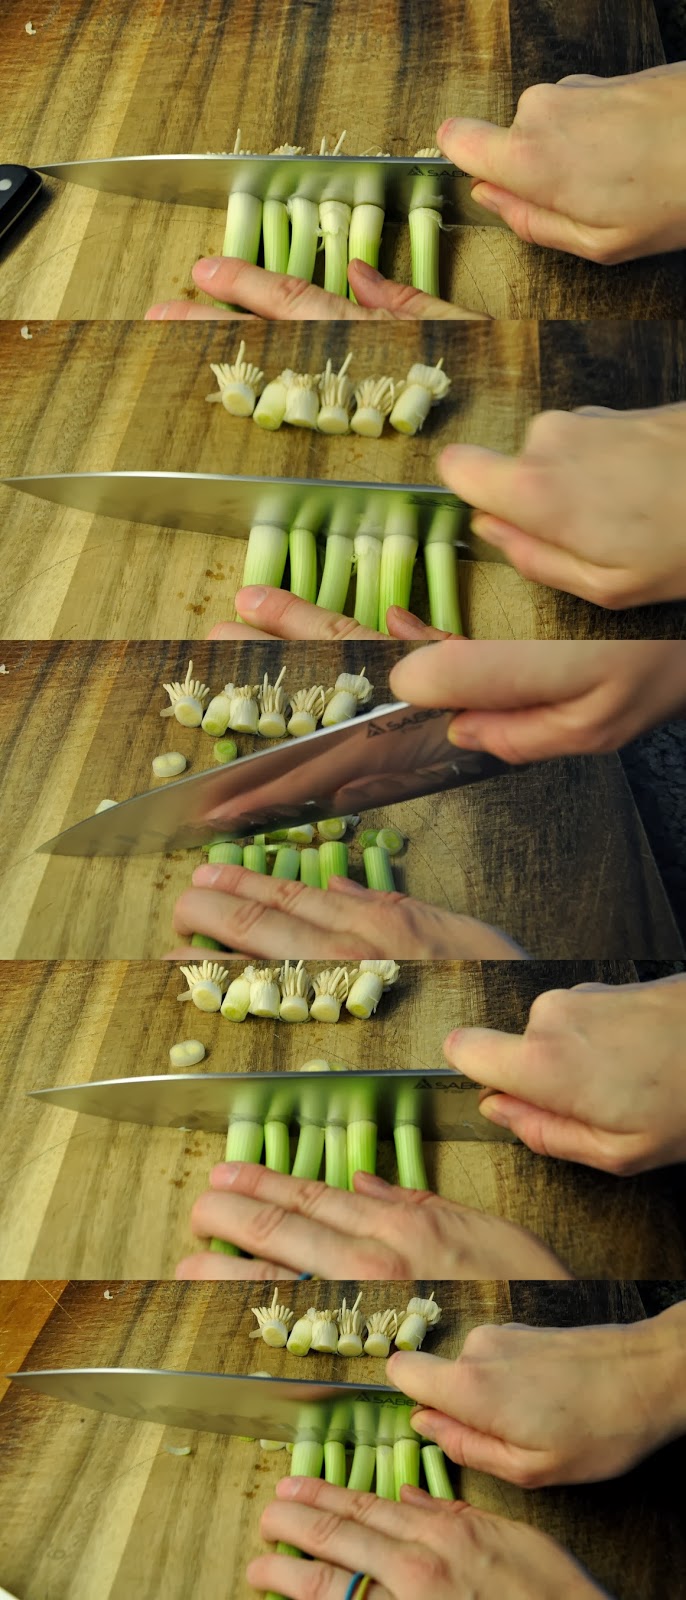
I took a class called "Chop Like a Pro!" from the Arkansas Extended Learning Center.  After learning these tips/tricks, my prep time in the kitchen has dramatically decreased.  

First off- I use a wooden chopping board as it is the softest surface for your knife.  I only use the wooden board for chopping veggies- I don't want to cross contaminate raw meats with the board.  You could have a board for veggies, one for fruits, and one for meats (I would recommend plastic dishwasher cutting boards for meats though).  As for the knife itself, this is a chef's knife.  There are other long knives, and you need to find a knife that feels comfortable in your hand.  It should feel like an extension of your arm/hand. 

Holding the Knife:
You should grip the blade of your knife with your thumb and finger (almost pinching it).  It is the most efficient way to hold it.  You can hold all knives this same way, regardless of their size.  It is most common to find people putting their pointer finger on the top of the knife to push the blade down, but it is much slower and all the strength must come from one finger rather than your hand/arm.


Scallions:
Cut the tops off, then rock your knife and move down the length of the onions.  You should lift the handle up, then press down and slide blade away from your body.  Practice rocking the knife to see if you like the feel of it.


Dicing/slicing Tomatoes:
If your blade is sharp enough, you can use a chef's knife.  Otherwise, you might want to use a serrated knife to cut the skin.  Stand the tomato on the stem (it is the most stable surface), and make slices almost all the way through (if you cut all the way through, then it takes forever to dice them all!).  Then turn the tomato 90 degrees and slice down almost all the way through.  Now turn the tomato on its side to slice into dice.  Consistency in size is your goal.


Herbs:
You can cut most stems and use them if you want.  I removed the stems here as I didn't need all the cilantro.  You want to roughly cut the herbs, then rotate them, cut again, and again and again.  You can see that once the herbs get smaller, I switch my hand from a "claw" (with tip of finger tucked in), to a flat hand to assist.  You will rock your knife, gather herbs into a pile before rocking your knife through them again.


Bell Peppers (Apples, anything with a core):
There are a few different ways to cut things that have a core, and this one is called the box method.  You trim the bottom so it is a stable surface, then take your knife and go around the core.  Once all your pieces are off the core, you can slice them as fine/chunky as you would like.  Once the bell pepper is off the core, cut into slices with the shiny side on your cutting board (then your knife won't slip off).


Onion:
Cut your onion in half so you have a stable surface.  With the stem away from you, slice around the onion (but do not cut all the way through it yet.  Keep it intact!).  Then put the stem in your non-knife hand and cut toward the stem twice.  Now take your knife and cut down to dice your onion.  See pictures for better explanation.  You can adjust your slices to make them as thick/thin as needed for recipes.


A goal to always keep in mind is consistency.  When cooking veggies especially, you want all the pieces to cook at the same rate.  If you have some pieces of onion that are really large, and others very small you will have some overcooked and some under cooked.  I did not show how to cut mushrooms, carrots, potatoes, etc, but you should be able to apply the above pictured methods to almost any fruit/veggie.

Happy chopping!  

Angels Among US


We are lucky in the Peterson Family to have many guardian angels watching over us.  We love our angels.  We miss them so much and often contemplate and wonder how life would have been different if they were still with us.  Unfortunately most of our children were very young and have very few, if any memories of their grandparents.  We want our children to know through our memories who their grandparents were.  Each year we still celebrate Grandma and Grandpas and now Tigger's birthday with angel food cake.  We each blow out a candle for them and share a memory we have with them.  It has became a very special tradition that we look forward to each year because we feel when we are talking about them and celebrating their life that they are close and we have angels among us.

Angel Food Cake

Preheat oven to 375 degrees
  

In a small bowl mix and set aside
1 cup of cake flour 
1 1/4 cup powdered sugar

In another bowl (I use my Bosch bowl) add the following ingredients
12 egg whites at room temperature 
1/4 teaspoon salt
1 1/2 teaspoons cream of tartar
1 teaspoon vanilla extract
1 teaspoon almond extract

Mix together in Bosch until stiff peak form and then slowly add 
1 cup sugar


When the mixture is very fluffy turn mixer down to low and slowly add flour powder sugar mixture.  Continue beating only until combined.  


Pour (actually it is more like scoop)  cake batter into clean pan - meaning not sprayed with anything nonstick.  Bake immediately for about 30 minutes or until cake is beautifully browned.  Take out of oven and turn upside down so the cake stays fluffy. 


Once cake is completely cooled slice and top with strawberries and cream.


Monday, February 17, 2014

A Variety of Foods


At the Royal Palace in Madrid with Emily
It was almost ten years ago now (!) that I spent a semester in Spain on a study abroad trip.  I was there with about 30 other kids from BYU and we all lived with a family during our 100 day stay.  Each morning we had classes at the local university and each afternoon we were free.  We traveled frequently, sometimes for a week, sometimes just for a day trip, so we stayed busy during our stay.  There were a number of students on the trip that would jump on the train to Madrid every day after class, spending hours exploring restaurants, theaters, museums, palaces and cobblestone streets in the heart of Spain.  I can think of once that I joined them: the rest of the time I walked back home and spent my time with my familia.  My hope in spending time in Spain was to find out what it was like to live there, not just sight see.

A huge part of the Spanish life, and probably European life at that, is eating.  Each day after class I walked the 20-30 minutes home and would help my madre prepare our lunch.  Everyone sat at the table together for a three course lunch each day.  It typically lasted about 90 minutes and was such an enjoyable part of my time there.  Meals are such an integral part of daily life in Spain; it was really neat to watch how food helped form the backbone of their daily life.  

Source
COURSE ONE
We always had fresh bread and typically started with a vegetable soup.  "Vegetable soup" is not what you're thinking: my madre would simply take whatever vegetables needed to be used, boil them until soft and blend them with her immersion blender.  Every day was different: bright orange with carrots, lime green with peas and cabbage, brown from lentils, white from cauliflower.  She always put in some olive oil and seasonings and some days were fantastic while others were...not.  While here in the US we often start with a salad, that was very rare in Spain (I can think of one or two times).  We may have also just had fresh vegetables: sliced cucumbers with some olive oil (are you seeing a theme here?), salt and pepper, for example.

The emphasis for the first course was always lots of vegetables.  I went to Spain thinking I hated vegetables but after having them so well seasoned, cooked so many ways (boiled, pureed, steamed, sauteed, baked, in main dishes, etc.) I found I really love vegetables.  I still shy from raw vegetables, so thank heavens I can cook!
COURSE TWO
After soup we jumped into the main course, which was sculpted by foods I still dream of!  Garbanzo beans with tomatoes and chicken, fish with rice, rice with potatoes and ham, a warm salsa mixture with poached eggs.  It was all so different for me, but always fresh (based on what was at the market that day), always different, filled with vegetables and seasoned beautifully.  I wrote down many recipes there and have sadly not been able to get many to turn out.  I look forward to the day I go back and join my familia at the lunch table again.  
COURSE THREE
The third course was dessert, but so different from our dessert I hesitate to call it that!  Cookies and cakes are usually for breakfast in Spain (my kind of breakfast!), so dessert was often fresh fruit, a cheese platter (which was actually a foot-long tupperware filled with cheese - some of which was there when I arrived and still aging when I left!) or yogurt.  We would sometimes have a plain yogurt cake, which is a simple combination of a few ingredients (called yogurt cake because you use the yogurt container to measure everything).

Over the past few years I've spent a lot of time reading about French eating, a very trendy topic, and have found that the Spanish have very close ties to the French.  Both cultures highly prize their culinary habits and both derive deep satisfaction out of their time eating.  It is a fascinating lifestyle, very different from our own in many ways (they would never eat standing up or in the car, never eat alone, don't really snack, and don't feel guilty for indulging in foods they enjoy).

I don't think it's possible for me to mimic their lifestyle, but I do think variety is realistic.  The French have an unwritten rule of not serving the same meat twice in a week, for example.  The focus is on always changing things, modifying recipes, adjusting seasonings, and focusing on what is fresh.  Fruit is enjoyed in the spring, summer and fall, when it is growing locally and full of flavor.  Winter is for stews, meats and roots.  Vegetables are eaten in season, at their peak, enhancing their phenomenal richness.

Like several of you, I sometimes find myself stuck in the same dozen recipes, making them over and over until I am sick of them.  I want to shift my cooking focus to be on novelty and change, so I want to go one full month without cooking the same recipe twice!  Would anyone care to join me?  I'm just going to focus on dinner, which will likely be just a main dish and a side (no three courses here for us.  Yet.)

A few of my online favorites, to kick you off:

Poached Eggs with Cheese and Chickpeas - we are not often vegetarian, so you can be sure anything vegetarian on this list is fantastic.  This is great with crusty bread.

Balsamic Chicken Noodle Bowl - this is pretty unreal and, I timed it, took me 23 minutes from start to finish.

Carrot Soup - we made this with fresh carrots and were quite surprised at how great it was!

World's Best Lasagna - more than 8,000 reviews and five stars should definitely mean something.

Chicken and Avocado Enchiladas in Creamy Avocado Sauce - a great excuse to eat even more avocados.

Jalapeno Popper Chili - we just made this two weekends in a row and loved it both times.  We have done two jalapenos (no seeds) and it has not been spicy enough for our liking yet.

Asian Slaw with Ginger Peanut Dressing - this is so fresh and a great combination of flavors and crunchiness.  We don't put the dress on ours until we serve: it keeps great in a bowl in the fridge for several days of lunch!  Mary, I bet you could change this to be peanut free easily.

Lemon Lentil Soup - another vegetarian recipe.  This one is also great with fresh bread.


Do you have suggestions of some great dishes?  I'd love to see comments below!

Bon appetit!

-Rachel

Saturday, February 15, 2014

Roasted Vegetables


Harmon’s grocery store offers fantastic cooking classes that I love to consider attending.  To date, I have been to two:  TJ and I attended a knife skills class that we loved and for a friend’s birthday last year, she and I attended a class on herbs and oils.  It was enjoyable (though I stink at tasting spices and naming them blindly) and we made roasted vegetables, which has become one of our regular recipes.  This is a great way to enjoy fresh vegetables and roasting makes them extra flavorful.  Feel free to mix up which vegetables you use (we have never used zucchini because…I just don’t adore it).


Roasted Vegetables
1 red bell pepper, seeded and diced
½ yam, cubed (*I usually just use the whole thing)
1 zucchini, diced
1 carrot, diced
1 parsnip, diced
½ red onion, quartered
1½ teaspoons chopped fresh thyme (worth getting fresh, but if you don’t have it, just use dried)
1 tablespoon chopped fresh rosemary (worth getting fresh, but if you don’t have it, just use dried)
2 cloves garlic, minced
3 tablespoons olive oil
1 tablespoon balsamic vinegar
Salt and freshly ground black pepper

On a half sheet tray combine all ingredients and cook in a 375 degree oven.  Cook until vegetables are fork tender, but still have a snap.  Cooking time should be around 25-30 minutes depending on how the vegetables are cut.

*Note on cutting these: peppers and onions will cook fastest, so cut them largest.  Also, we typically use a parsnip in this.  Have you ever had a parsnip?  They look like big white carrots.  They are great (disclaimer: we have only had parsnips roasted, so can't attest to their flavor raw or otherwise).

*Another note: I thought that the longer these marinated in balsamic vinegar (which I could drink) the better they would be.  Wrong.  They get mushy, so don’t do that.  

*A final note: we don't peel our carrots anymore.  We wash them well and save ourselves a lot of time and peels by just eating them as they come.  It's terribly liberating.

Enjoy! And HAPPY VALENTINE'S DAY (here's hoping Holly gets a ring!)

Wednesday, February 5, 2014

Costco/Sam's Shopping and Cooking Ideas

The other day I ran across a post on Facebook about $20 meals from Costco for $150. Upon checking out the site I saw that there was information about what to buy when you go to Costco (there's one for Sam's Club as well), along with all the meals that you can make and of course the recipes. I haven't tried this out yet but thought it might be fun to pass on! URL is below:

Happy Cooking!

http://www.5dollardinners.com/20-meals-from-costco-for-150-recipes-printable-shopping-lists/

-Sheri :)

Wednesday, January 22, 2014

Protein Pancakes

I always like to have breakfast foods that are quick, easy and healthy.  I love this protein pancake recipe.  The ingredients sound a bit strange but they taste marvelous.  I often make up a batch and freeze them individually on a cooling rack.  Once they are frozen I put them all in a large ziploc bag so they are each frozen individually.  Then on crazy mornings I pull them out of the freezer, pop them down the toaster and smother them with butter and enjoy worm comfort food on the go!


For these pancakes you will need eggs, oats, cottage cheese, vanilla, cinnamon, and a sweetner.
(I do realize this sounds a little crazy for pancakes - but trust me!)


Combine all ingredients in a blender and blend until smooth.
Cook on a griddle just like normal pancakes at 375 degrees.  


Enjoy a delicious and nutritious breakfast!


Protein Pankcakes
12 egg whites
2 cups of cottage cheese
2 cups of oats
1 teaspoon vanilla
1 teaspoon cinnamon
Dash of Truvia 

Blend in a blender until smooth.  Cook on griddle at 375.  Enjoy!

 -Mary

Tuesday, January 21, 2014

Snacks

Hello Sisters!

I was getting my wisdom teeth out on my scheduled date, so I am going to post right now. Hoorah!

I am often on the go and running around for most of the day so today I am going to share two of my favorite recipes that I have found.

I don't know if they will be helpful for any of you, but I have found them to be great filling snacks when I want more than just an apple but don't have much time to whip something out. I generally make them on Saturday or Sunday and then they are readily available throughout the week.

Enjoy!


With this recipe I have used both rhodes rolls frozen dough and pillsbury cresent rolls. I am sure it would be a fun activity with the kids to make a simple bread dough and stuff the chicken into those as well. 


Second- I love to make small servings of things in muffin tins. I have made these mini pizzas a couple of times and they are great to be re-heated and eaten on the go. I have used tortillas like is demonstrated here, but I have also used rhodes rolls frozen dough and just pressed a little bit of that into the bottom of the muffin tin then added the sauce, cheese, and pepperoni. 


Best wishes to all!

Holly Christine

Saturday, January 18, 2014

Shopping for the Wise

Living down as school has taught me all sorts of wonderful tricks to shopping at the grocery stores. I love to go and find all the good deals on foods. Many of you know that most stores have sells on meat when they are almost expired, same with bread and almost anything and everything. You just have to look. I love to buy these foods because usually you can just cook and freeze it. If it something like sour cream it usually will be marked down a week prior to the expiration. So make something that calls for sour cream. I also have found a list for in season Fruits and Vegetables! Perhaps this will be beneficial to you, I use it and love it!!

Shop Seasonally
-Paige

Wednesday, January 15, 2014

Egg and Avocado Quesadillas

Sometimes you just need a dinner that is quick, simple, delicious, and uses ingredients that you almost always have on hand: this is that recipe.

You'll notice the recipe is written pretty loosely: it's quite adaptable/forgiving so adjust as you like.  The one downside is that if you want to eat them piping hot you can't all eat at the same time (unless you can master having multiple pans going simultaneously, which would be impressive indeed).  TJ and I make two and eat them while the pan is off the heat so we can eat together. 


Egg and Avocado Quesadillas

Adapted from Everyday Reading

Egg
Avocado
Cheese (queso blanco, cotija, cheddar, a Mexican blend - any of these taste great)
Tortilla 
Salt and pepper
Butter
Salsa

Sheri, I think this would be great with corn tortillas, so it's gluten free.  If you heat the corn tortillas first - almost until you can't touch them - they will fold without breaking.  Of course you probably already know that.

1. Heat a good pan over medium high heat (we do between 6-7 out of 9).
2. While it's heating, beat one egg in a bowl and put salt pepper on it.
3. Put some butter in the pan (it should be hot enough that it sizzles rather immediately) and move it around so it covers the whole bottom of the pan.  I will confess here that we have never tried using non-stick spray, but it would probably work.
4. Pour the egg in and let it sit until it's mostly set.
5. Put a tortilla on top of the egg and flip the whole thing over, so you're holding the tortilla with the egg on top.
6. Put some sliced (or mashed or whatever) avocado on half the egg.
7. Put some cheese on half the egg.
8. Fold in half (quesadilla style) and put back into the pan.
9. Cook until golden/browned (whatever your flavor).
10. Serve with salsa on top.

And now, these same directions in pictures.  :)  Enjoy!

-Rachel


Tuesday, January 14, 2014

Menu Planner

Every single day, multiple times a day, I hear the infamous question, "Mom! What's for dinner?!"  And, if you are like me, you are racking your brain for an answer.  Or perhaps you are on top of your game plan already because on Mondays you have tacos, Tuesdays spaghetti, Wednesday enchiladas, etc.  Or maybe you have just finished a long day of classes and work, and you now need to attempt to whip up something from the belongings of your fridge and pantry.  While pregnant with Cooper and Brock, my appetite and energy levels drastically changed.  I found myself frantically searching my cookbooks for something appealing (and easy) that I could put together.  If I needed to run to store, I could load Max and Kate into the car and head over to Wal-Mart to grab the rest of my ingredients.  However, once we doubled the number of kids in our family, dashing off to the store and throwing a recipe together at the last minute was not possible.  I needed a game plan.  I searched online until I found something I could work with- a monthly menu planner.  I tweaked it a little bit to fit my needs.  There are three tabs at the bottom of the page titled: Menu, Main Dishes, and Side Dishes.  I went through all my different cookbooks (and had my kids do it too for things that looked good to them), and added the meals to planner.  

The Main Dishes have the following headings: Chicken, Ground Beef, Beef, Pork, Breakfast, Other, Vegetarian.  I have added the meals that my family would eat under each proper heading.


Under the Side Dishes tab you can add: Sides, Vegetables, Breads, and Desserts.  I have also added cookbook info (OBB= Our Best Bites; WCB= Ward Cookbook, 6S= Six Sisters, etc).  Admittedly, I did not really do many desserts.  I only ever make dessert on Sundays when we have people over, so I go through my cookbooks and decide, typically on the day of, what looks good.


Once your Main Dishes and Side Dishes are filled in, you go the Menu tab and select what meal you would like when from the pull down option.  You can then print out the calendar if you would like to post it.


 When I have my calendar filled in, I am able to go to the grocery store and get all the ingredients I will need for the week/month.  When I hear the question, "Mom, what's for dinner?" I am now able to give an actual answer!

If you would like me to email you the excel document, please let me know and I will happily send it your way!

-Julie


Saturday, January 11, 2014

Pumpkin Streusel Bars

I have had several people ask me for the hot pumpkin streusel bar recipe that I made over the holidays.  I thought to kick off, I'd share so everyone has it!


Pumpkin Bars

1 pkg yellow cake mix (save 1 Cup for topping)
1 egg
2 Tbsp flour
1/2 cup melted butter

Mix and press into the bottom of a 9x13 pan.

1 small can pumpkin
1/2 cup brown sugar
1 cup sugar
2 beaten eggs (just enough to mix, not firm or white)
2 tsp pumpkin pie spice
2/3 cup milk

Mix together and spread over bottom layer.

1 cup reserved cake mix
1/4 cup sugar
1/4 cup butter, softened

Cut into a crumb mixture and press lightly on top of pumpkin.

Bake at 325 degrees for 45 minutes.  Test with a knife in the middle for doneness.  Serve with whipped cream or ice cream.

-Sara